
If you recently purchased a HomePod or HomePod Mini, you may remember how you didn’t have the option to even connect to a Wi-Fi network while setting up the device. Accordingly, you may be surprised to know that the HomePod wi-fi network can in fact be changed, albeit to a limited extent.
By default, when you set up your HomePod using an iPhone or iPad, your HomePod makes use of the Wi-Fi network that your iOS/iPadOS device is currently connected to. This makes sense since both the HomePod and your iPhone need to be on the same network to function properly. However, if you switch to a different Wi-Fi network on your iPhone, your HomePod doesn’t automatically change the network. Hence, you’ll need to change it manually. Interested in learning what you need to do? We’ve got you covered. Let’s run through the steps to switch the HomePod’s Wi-Fi network within seconds.
How to Change HomePod WiFi Network
You’ll need to use the built-in Home app on your iPhone or iPad to change the wi-fi network used by HomePod. Here’s how it works:
- Launch the Home app on your iPhone or iPad.

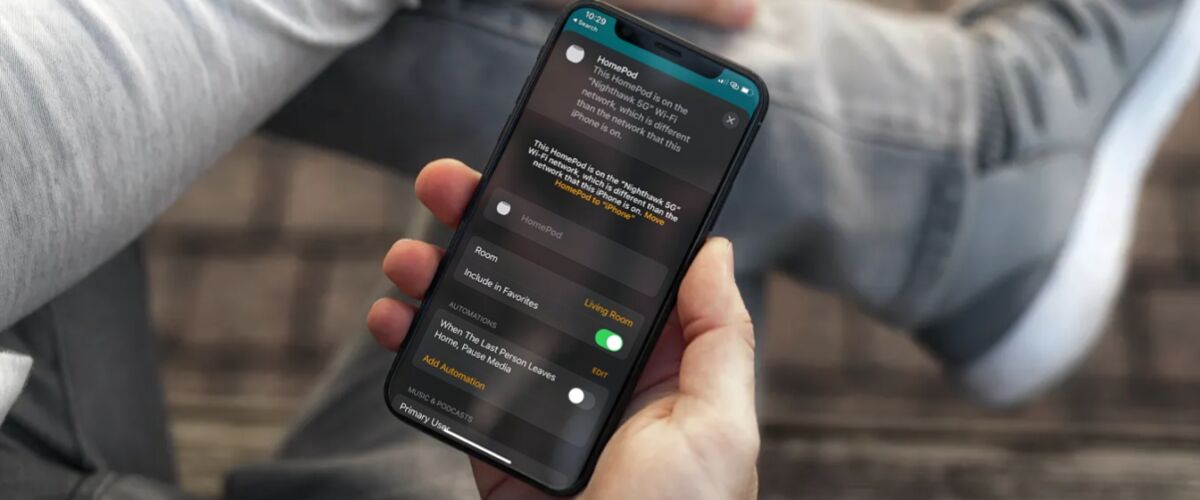
- When you find your HomePod in the Home section or Rooms section of the app, you’ll see a yellow exclamation mark next to it indicating that there’s an issue with your Wi-Fi network setting. Long-press on your HomePod to access its settings.
- Here, at the top, you’ll be detailed why you’re facing the Wi-Fi network issue. Scroll down in this menu to access more options.
- Now, you’ll see the message that your iPhone is connected to a different Wi-Fi network. Right below this message, you’ll see a yellow text hyperlink that lets you move your HomePod’s network. You’ll be shown the name of the Wi-Fi network that your iPhone is currently connected to. Simply tap on the “Move the HomeePod to” hyperlink.
- Wait for a few seconds until HomePod updates the network settings. Once complete, everything in the music playback section will successfully load up.


There you go, you’ve successfully changed the Wi-Fi network on your HomePod.
We know what you’re probably wondering, but no, your HomePod cannot function if it’s not connected to the same Wi-Fi network as your iPhone or iPad that you used to set it up in the first place. You can only access the options that we discussed when your HomePod is having issues connecting to a Wi-Fi network. Perhaps that will change down the road, but for now that’s the way it works.
Therefore, the second you change the Wi-Fi network on your iPhone, Siri will stop responding to queries due to connection issues. However, by following the above steps, you can get the issues resolved within a matter of seconds.
Note that having different wi-fi networks by the iPhone/iPad and HomePod may be just one of the potential reasons why your HomePod may be facing connectivity issues.
If you’re moving your HomePod to a new location or you changed the Wi-Fi password, it may take some time for the HomePod to respond again.
We hope you were able to learn how to change the Wi-Fi network of your HomePod, in case you were facing an issue. Do you want Apple to add manual network selection as an option for the HomePod? Do share your personal experiences and feel free to share your valuable feedback in the comments section down below, and don’t miss more HomePod tips.


