How to Fix NVIDIA Control Panel Not Opening in Windows
Are you failing to tweak your graphical settings because the NVIDIA Control Panel won’t open? Here’s what to do.
Key Takeaways
- Try running NVIDIA Control Panel as an Administrator to fix permission-related issues preventing it from opening.
- Perform a clean install of the NVIDIA graphics driver to resolve problems with the control panel that are caused by corrupted files.
- Ensure that necessary NVIDIA services are running in the Service Mananager window.
The NVIDIA Control Panel allows you to customize your NVIDIA graphics card’s settings, from resolution and color to text filtering to antialiasing. However, malfunctioning drivers, processes, and services can cause the NVIDIA Control Panel to fail to open. Here are some fixes you can try if a simple restart doesn’t work for you.
1. Run NVIDIA Control Panel as an Administrator
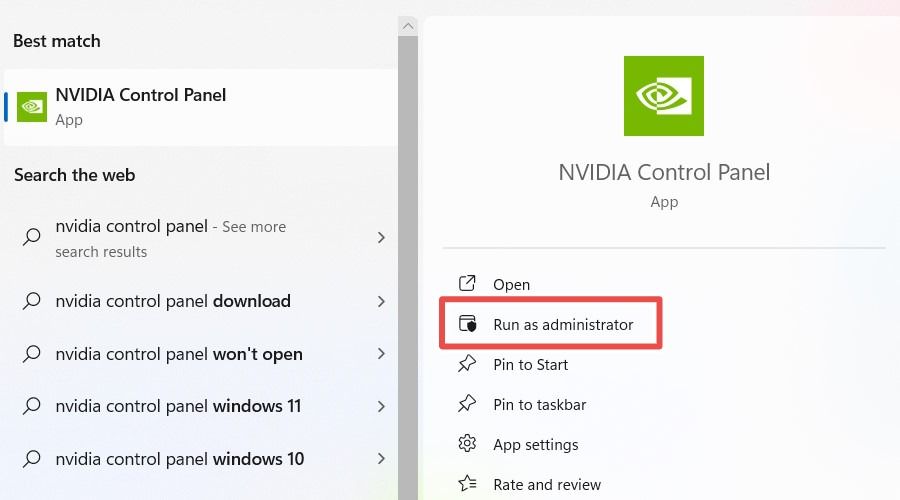
Sometimes, running an app with administrator privileges can help fix permission-related issues that prevent it from opening. To do that, click “Search” in the Taskbar and type “NVIDIA control panel” in the Search box. In the search results, click “Run as Administrator.”
Hopefully, whatever prevented the NVIDIA Control Panel from opening will no longer be an issue.
2. Clean Install NVIDIA Graphics Driver
If the NVIDIA graphics driver encounters a problem, it will also affect the NVIDIA Control Panel. When you perform a clean install of the NVIDIA graphics driver, you’ll remove all traces of the old problematic driver. Once your older driver has been removed, install a fresh copy of the driver. If everything works out, NVIDIA Control Panel will open without issues.
3. Disable Fast Startup
Fast Startup helps your computer boot faster by saving its current state in a hibernation file. Because of this, your computer doesn’t clear everything the way it would if it were shut down normally. This can interfere with how some apps, such as the NVIDIA Control Panel, start when you boot it back up.
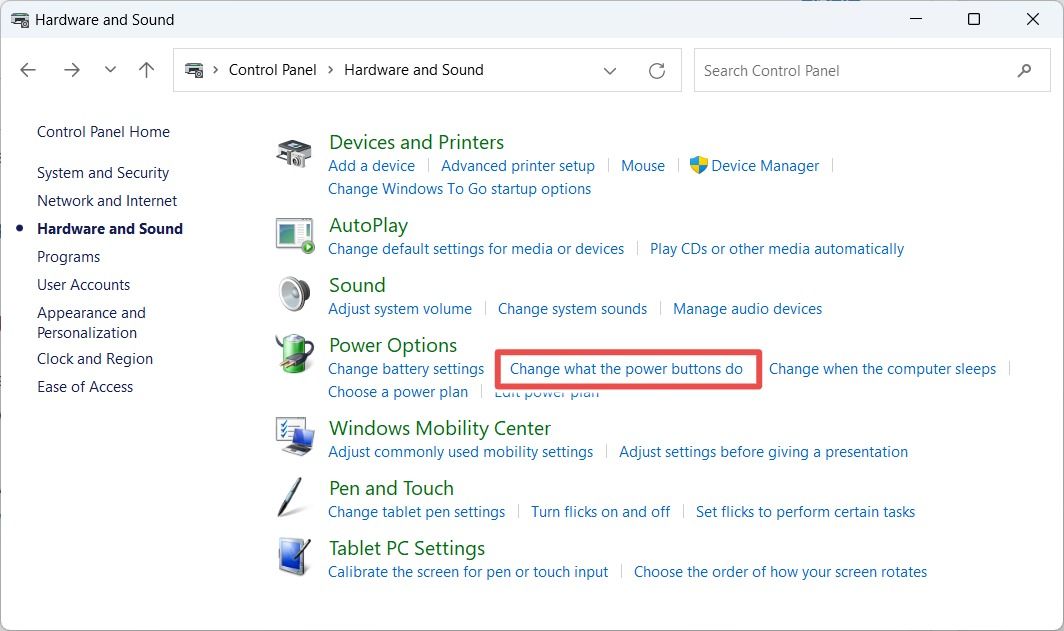
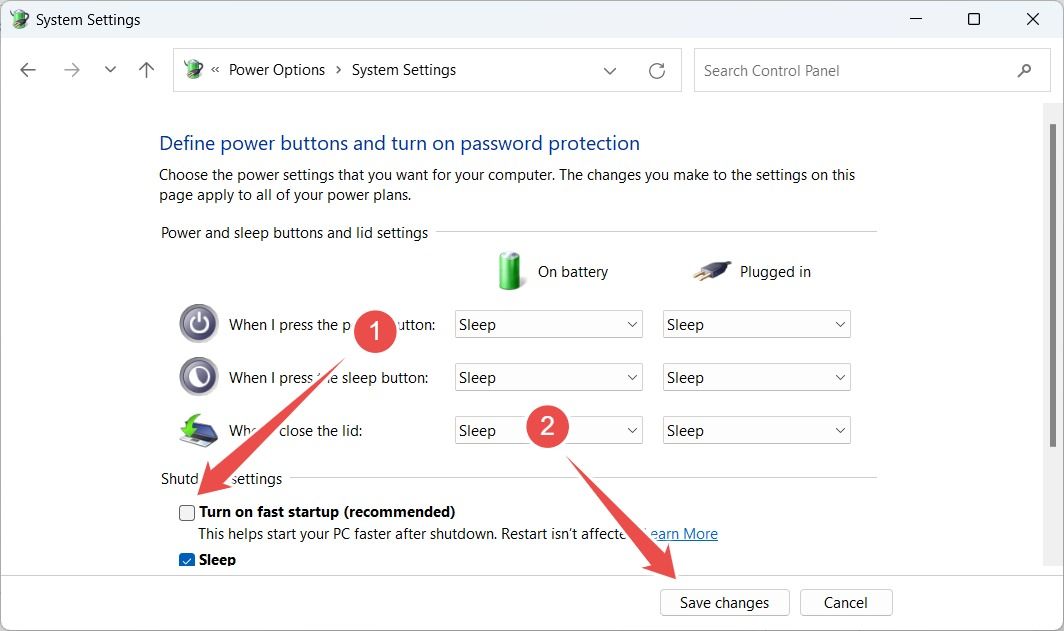
To disable Fast Startup, press Win+R to open Windows Run, type “control panel,” and click “OK.” Head to Hardware and Sound > Power Options and click on the “Change What the Power Buttons Do” link.
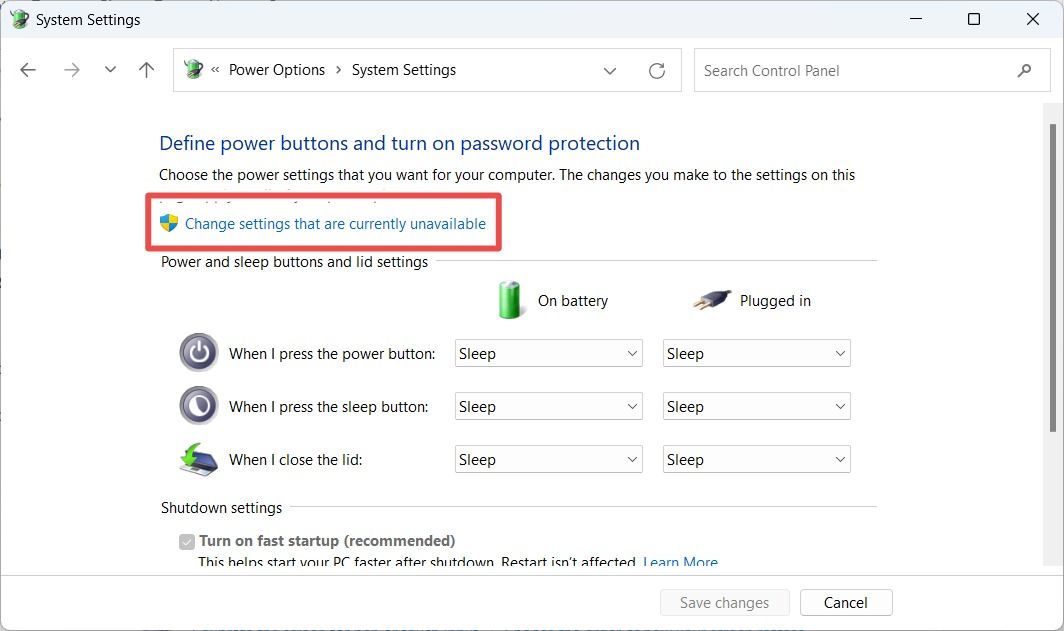
Click the “Change Settings That Are Currently Unavailable” link.
Next, uncheck “Turn On Fast Startup,” and then click “Save Changes.”
Restart your computer and try launching the NVIDIA Control Panel again.
4. Disable NVIDIA Processes in Task Manager
NVIDIA Control Panel could fail to open because one of the NVIDIA processes in Task Manager has malfunctioned. You should try stopping them to see if that fixes things.
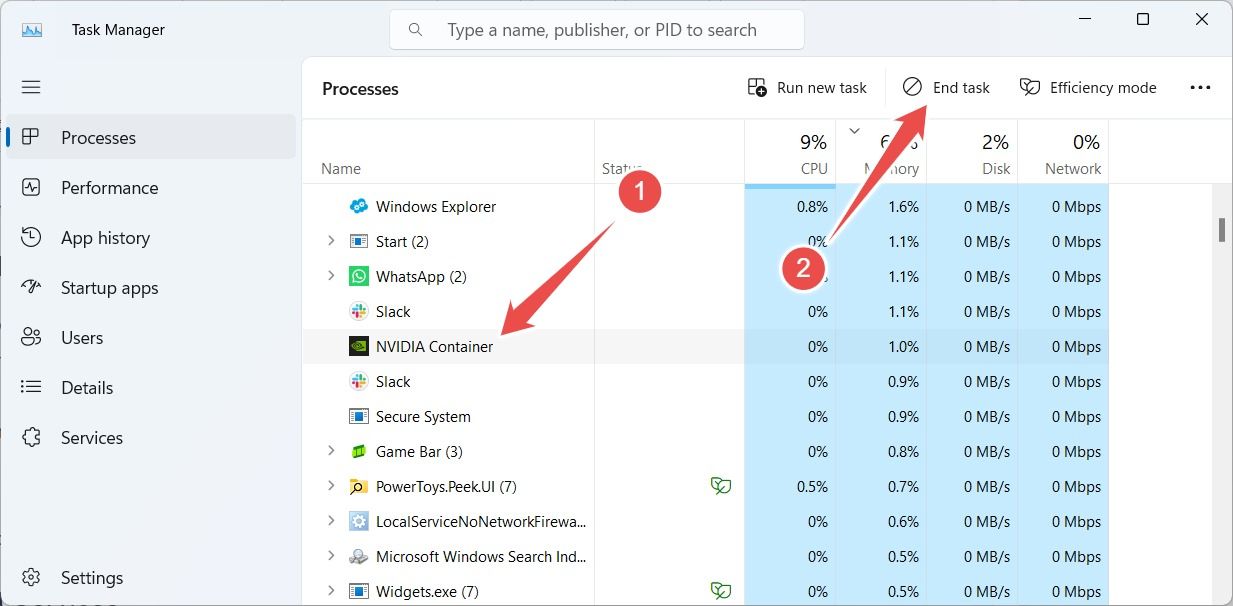
To do that, right-click somewhere empty on the Taskbar and select “Task Manager” or press Ctrl+Shift+Esc. Next, select the “NVIDIA Container” process and click “End Task.”
Disable all other NVIDIA processes like “NVIDIA Web Helper Service.” Then, try opening the NVIDIA Control Panel and see if it works.
5. Restart NVIDIA Services
For the NVIDIA Control Panel to launch properly, certain services need to be running. If those services have malfunctioned or aren’t running at all, the app could fail to open.
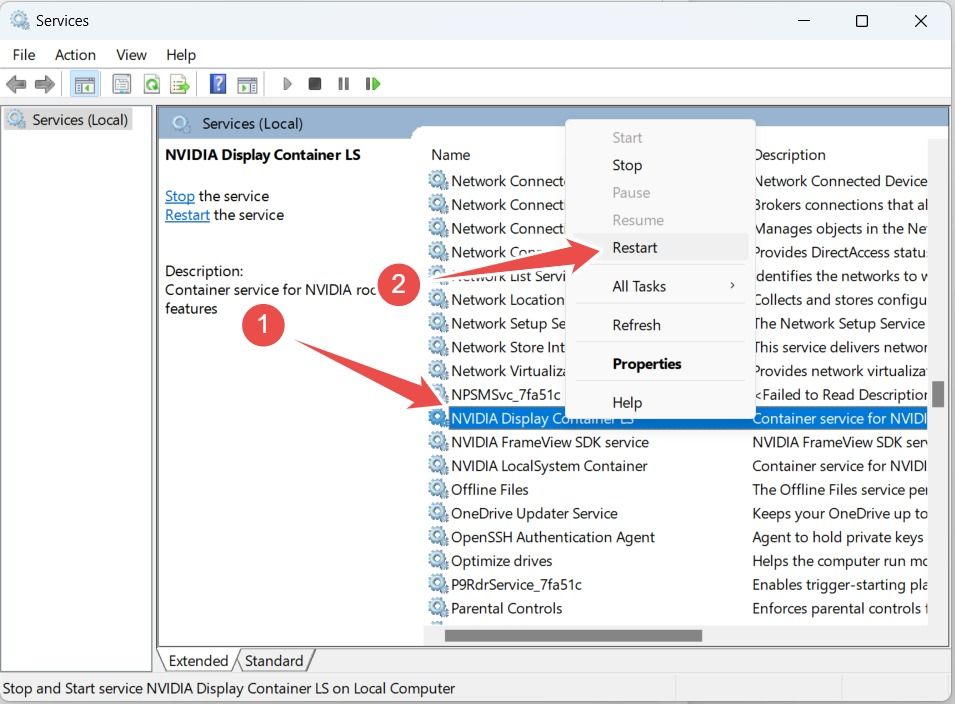
To make sure that the necessary NVIDIA services are running, press Win+R to open Windows Run, type “services.msc,” and click “OK.” In Services, right-click “NVIDIA Display Container LS” and select “Start” or “Restart.”
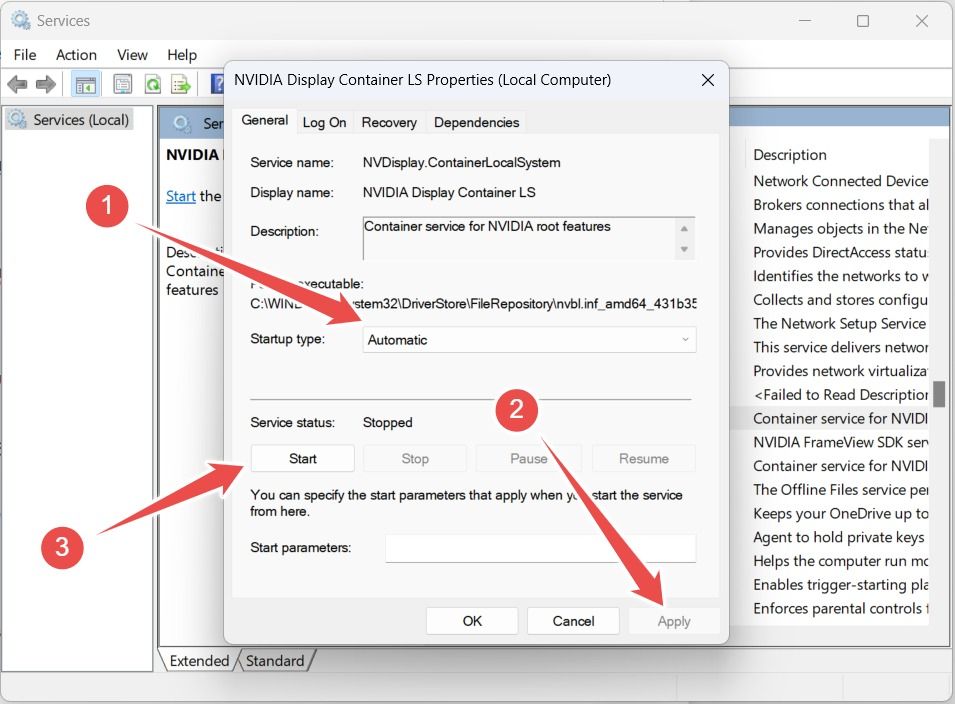
If those options are grayed out, select “Properties” instead.
In Properties, set “Start Type” to “Automatic” and click “Apply.” Next, click “Start,” and then click “OK” to start the service.
Repeat the steps above for the “NVIDIA FraveView SDK service” and “NVIDIA LocalSystemContainer” services as well.
6. Repair or Reset NVIDIA Control Panel
If the NVIDIA Control Panel has become corrupt, it can fail to open. Repairing it can help fix this issue.
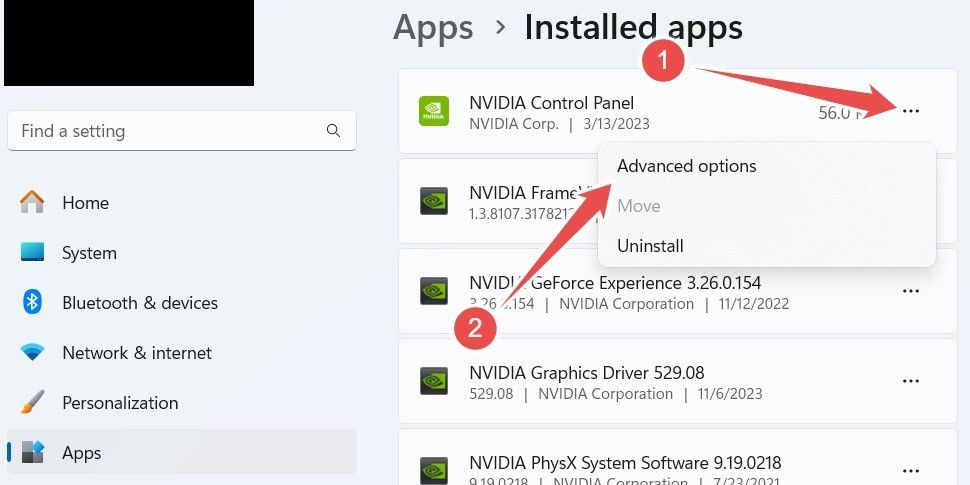
If you’re on Windows 11, press Win+i to open Settings and navigate to Apps > Installed Apps. Find “NVIDIA Control Panel,” click the three-dot icon next to it, and select “Advanced Options.”
If you’re on Windows 10, open Settings and navigate to Apps > Apps and Features. Then, click the “Advanced Options” link under “NVIDIA Control Panel.”
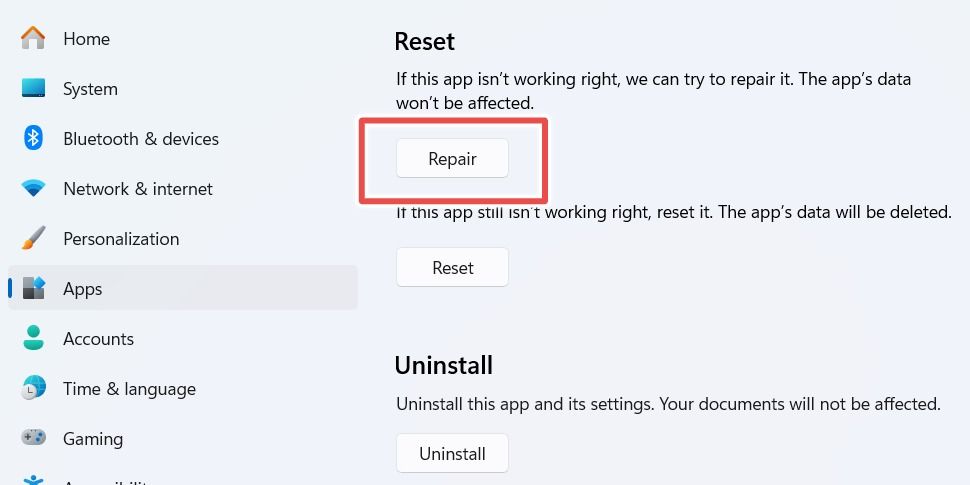
Scroll down to the Reset section and click “Repair.” This process will repair the app without affecting your data. Afterward, try starting the app and see if it opens.
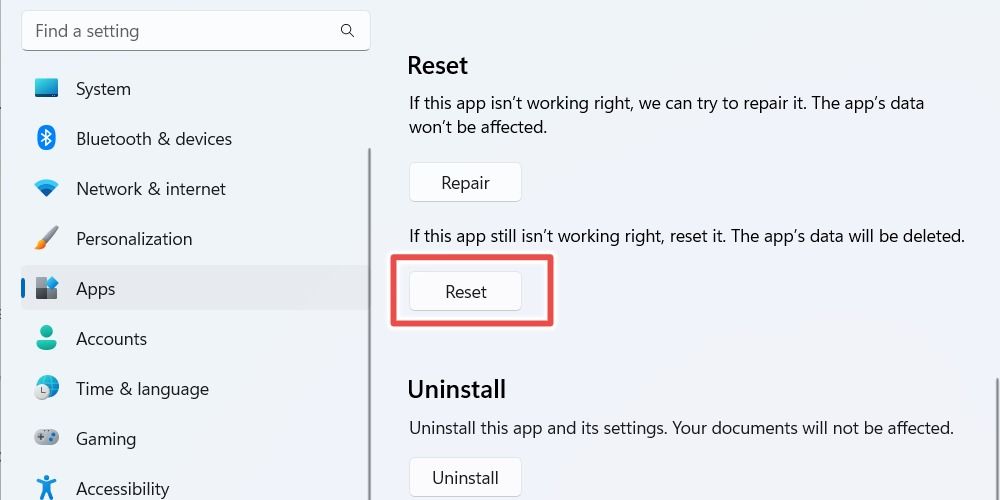
If it doesn’t, go back to NVIDIA Control Panel’s advanced options and click “Reset.”
Keep in mind that this will delete the app’s data, meaning you’ll have to configure the settings again.
7. Reinstall NVIDIA Control Panel
If the resetting NVIDIA Control Panel didn’t help, you should try uninstalling the app. Then, you should connect your Windows computer to the internet and install NVIDIA Control Panel from the Microsoft Store. Hopefully, you’ll be able to open it afterward and tweak your NVIDIA graphics card settings again.
If all of that fails, you should try using Display Driver Uninstaller to remove any remnants of old drivers that may be on your system. Dedicated driver cleaners aren’t typically necessary anymore, but there is no real downside to trying. It is also always possible there is a bug in the current version of the software that prevents it from opening, and installing a slightly older version of the drivers may fix the issue. If none of that does it, then you’re left with the nuclear option: reinstall Windows. It isn’t ideal, but it ensures that you’ll have a fresh start.


