
Mac OS X defaults to a predefined set system font size for all onscreen text and user interface elements, and while many users will find the default text size to be sufficient, some users may wish the system font size was larger, and some may wish the Mac system text size was smaller. It turns out that Mac OS may not offer a method of directly changing all system fonts, but instead Mac users can adjust their screen to increase or decrease the size of the system font, onscreen text, and everything else seen on screen as well.
To change the system text size this way, we’ll be changing the screen resolution of the Mac display itself. In some cases, this may mean running on a non-native scaled resolution, which tends to look best on Retina displays. There’s a trade-off with this approach in that you lose or gain screen real estate (space for windows and stuff on the display) in order to increase or decrease the size of text and interface elements. The example images below will help to show this, but it’s better experienced yourself on your own Mac and display.
How to Increase Screen Element & Text Size in Mac OS X
This will increase the size of all onscreen fonts and interface elements by using a different display resolution, it’s slightly different for Retina displays and non-Retina displays, we’ll cover both:
- Go to the Apple menu and choose “System Preferences”
- Go to the “Display” preference panel, then to the “Display” tab
- For Retina Display Macs:
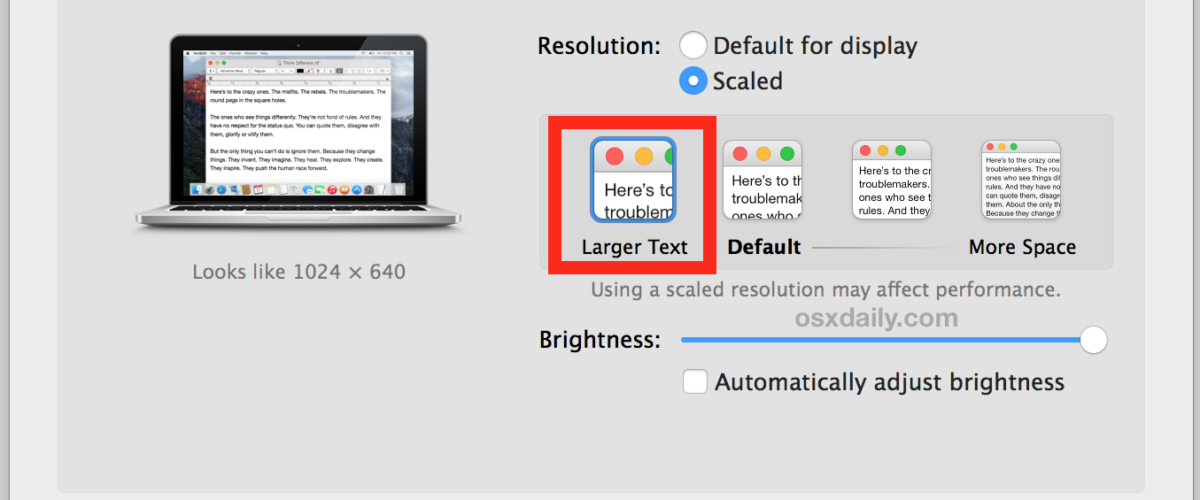
- Next to the “Resolution” section, choose “Scaled”
- Select “Larger Text” from the options available, you will see a pop-up message saying “Are you sure you want to switch to this scaled resolution? When using this scaled resolution, some applications may not fit entirely on screen.” so choose “OK” to confirm that you wish to use the larger text size scaled resolution

- Next to the “Resolution” section, choose “Scaled”
- Select a smaller screen resolution from the list of available resolutions, this may include 1080p, 1080i, 720p, 480p, or direct resolutions like 1600 x 900, 1024 x 768, 800 x 600, 640 x 480 – to make the onscreen text size and other onscreen elements larger aim for a smaller number, such as 720p or 1024×768

The “Larger Text” option for Retina displays is similar to 1024×768 on a non-Retina display, and will dramatically increase the size of onscreen text and interface elements for most Mac laptops like the MacBook and MacBook Pro, as well as iMac and other high resolution displays. Setting the screen resolution to 1024×768 or larger on a non-Retina display will also dramatically increase the size of onscreen fonts and interface elements.
The animated GIF below demonstrates the four Retina settings being cycled between, with Larger Text being the first and displaying as the biggest of the group.

The Larger Text scaled display resolution option is great for users who have difficulty reading or interacting with onscreen elements with MacBook Pro and iMac displays, but it’s also incredibly helpful to use when any Mac is connected to a TV screen and viewed at a distance, since elements and interactions will be larger and easier to read at the larger size.
The other sizes, such as “More Space”, allow for considerably more screen real estate but at the expense of much smaller fonts and interactive interface elements. This trade-off largely depends on the user.
What do the Scaled Display Sizes Look Like?
You really need to use the different resolutions on the individual Mac yourself to get the best idea possible of how things will look on the individual screen, but the images below will give you a general idea of how large or small various items will appear on a display. As you can see, the font and text sizes change as well as the size of everything else on screen, including buttons, icons, windows, menu bars, title bars, literally the size of everything on screen is impacted by adjusting and scaling resolutions this way:
Mac OS X set to display “Larger Text”

Mac OS X set to display size “Default”

Mac OS X set to display in-between scale size of text / space

Mac OS X set to display as “More Space”

For Macs with secondary screens or an external display, you can show all possible display resolutions for an external screen to reveal other screen resolutions which may otherwise be hidden from the Mac OS X default options.
Some may consider this a workaround, but aside from individually adjusting the font size in various applications, this is the only way to universally impact all onscreen text and font sizes on the Mac. It’s possible Apple will introduce greater text size and font size controls in future versions of Mac OS X, but in the meantime, adjusting the screen resolution is the only way to universally change the size of things seen on the display of any Mac.
Changing Font Size of Individual Apps in Mac OS X
We have shown how to change the text and font sizes in many other Mac apps before, if you want to set individual application font sizes the following articles may be helpful to improve readability:
- Change Finder text font size in Mac OS X
- Increase the icon size on Mac
- How to change the Finder sidebar item text size in Mac OS X
- Use Zoom in web browsers for larger text and easier reading in Mac OS X
- Set a minimum font size in Safari for Mac
- Change the font size of text in Mail app for Mac OS X
- Increase or decrease the text size in Messages for Mac OS X
- Change the text size in Terminal for Mac OS
- Change the text size of iTunes fonts
There are also similar options for iOS devices, but we’re focusing primarily on the Mac here. If you’re interested in finding adjustments for text items on an iPhone or iPad, use our search bar to locate tutorials for individual apps.
Follow Me:
Top Best Sellers!!


