![]()
![]()
With the Mac Messages app able to send and receive text messages along with iMessages, you’ll be in greater contact with friends, family, and anyone else who sends you a message. This is usually a good thing, but sometimes you’ll find yourself as a recipient to a conversation that just isn’t necessary to follow. For example, maybe you’re an unintentional third party on a multi-person conversation, and frankly you have nothing to add to the conversation. In situations like these, you could always enable system-wide Do Not Disturb mode with a schedule or quick-click, but perhaps a more appropriate option is to selectively mute the conversation in question.
You can mute any conversation going on in Messages app of Mac OS X this way, regardless of what platform the other participants are using, or whether it’s a group chat or a single message. Easy to do, it’s actually called “Do Not Disturb” (similar to the iOS and Mac OS system functions), except that it’s specific to a conversation in Messages app.
How to Mute Messages Conversations on Mac with Do Not Disturb
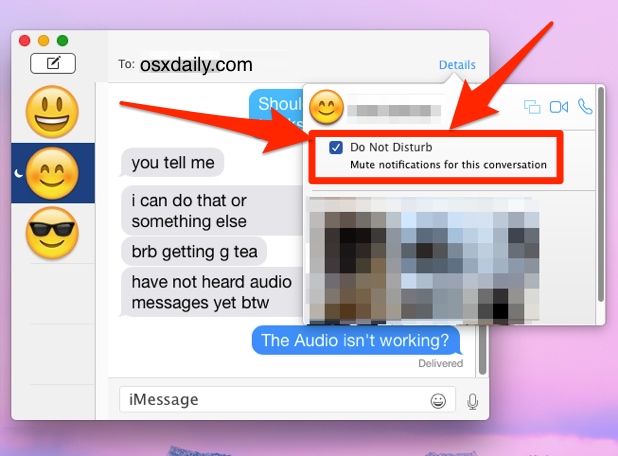
Here’s how to use the Messages Do Not Disturb feature to selectively silence any conversation:
- From the Messages app of Mac, select the conversation you want to mute so that it’s active
- Click on the “Details” button in the upper corner
- Check the box for “Do Not Disturb – Mute notifications for this conversation” – the effect is instantaneous and you’ll stop getting alerts, sounds, or notifications from this group chat


The message is signified as muted / Do Not Disturb with the familiar little moon icon from the system wide DND feature in iOS, which will appear next to the users name and avatar icon in the Messages conversation window sidebar. The user that is muted will have no indication that they have been muted, and you can still respond if you want to as well.
By the way, if you’re getting pelted by a barrage of messages, you may also want to mute the same conversation in iOS too using a similar trick on the iPhone and iPad.
To un-mute the conversation, simply click on “Details” and uncheck the “Do Not Disturb” box again. Don’t forget to do that, otherwise you may wind up in a situation where you think something is wrong when it isn’t, a common occurrence on the iPhone in particular.
Follow Me:
Top Best Sellers!!


