Microsoft Photos, the replacement introduced for the classic Windows Photo Viewer, has gained many new features and options with Windows 11.
The Photos app has evolved over the years and is pretty reliable these days. However, just like any other software, it might also throw errors or refuse to open at times.
If you have issues with the Photos app, you can do multiple things to fix the app. Like Windows 10, Windows 11 also lets you repair, reset, and reinstall the Photos app to resolve any issues without using additional software.
This guide shows you how to reset and repair the Photos app in Windows 11. For reinstall instructions, refer to our how to reinstall the Photos app Windows 10/11 guide.
NOTE: This guide helps you fix only the Photos app offered with Windows 11, not the corrupt photos/images/picture files you may have on your computer. The Photos app cannot help you repair corrupt pictures.
IMPORTANT: We recommend you close the Photos app before resetting or repairing it.
Reset the Photos app in Windows 11
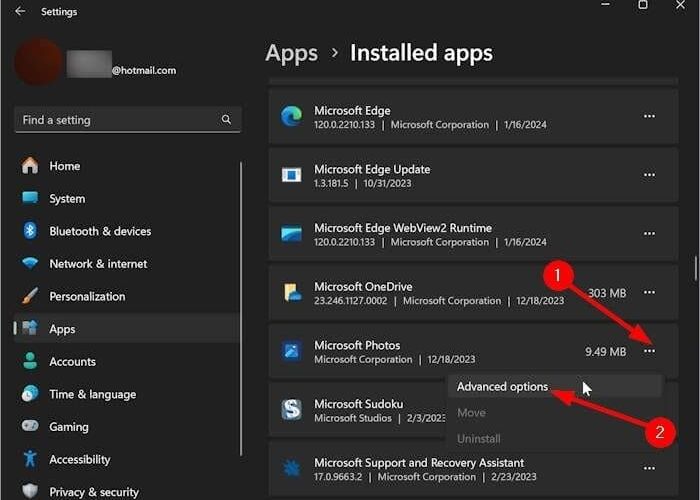
Step 1: Open the Windows 11 Settings app. Navigate to Apps > Installed apps page.
Step 2: Scroll down the list of installed apps to see the Microsoft Photos entry. Click the three dots next to the Photos app’s entry and then click Advanced options to see the advanced options available for the Photos app.
Step 3: Under the Reset section, click the Reset button. When asked for confirmation with a small dialog, click the Reset button again to reset the Photos app.
The process should be complete in a few seconds.
Once done, you will see a checkmark next to the Reset button to indicate that the resetting has been done successfully.
Repair the Photos app in Windows 11
Step 1: Navigate to Windows 11 Settings app > Apps > Installed apps.
Step 2: Click the three dots next to the Microsoft Photos entry and then click Advanced options.
Step 3: Scroll down the page to see the Reset section. Here, click the Repair button and then click the Repair button again when asked for confirmation to repair the Photos app. That’s it!
Once done, you may launch the Photos app to check if the issue is resolved.


